Serverless and Actions
Feb 23, 2021 · 7 Min Read · 7 Likes · 0 Comment
In JAMStack(aka static sites), we use different paid/free services for things like using Disqus for commenting, MailChimp for newsletters etc. These services come with a tradeoff, for example lack of privacy, bloated JavaScript and many more.
What if we can build them on our own using a serverless stack, with low to no cost and almost zero maintenance?? Why serverless, because these backend services will not run all time, rather run on demand basis. If we have limited minutes of run time, then we can probably run it at very low cost or free(depending on which serverless provider you are using). If we back it up with GitHub Actions to run cron jobs, that can save a lot of money 😤.
As actions speak louder than words, let’s build a project were we will combine serverless and GitHub Actions to create a full-fledged newsletter service.
Example project: Newsletters
As an example project, we are going to implement a newsletter service. Key ideas behind the implementation of this newsletter service are:
- Create a backend using Serverless stack to store email addresses.
- Send emails to those addresses periodically by running cron jobs using GitHub Actions.
Prerequisite
Before we start our project, we need to sort out two things first. One, which email sending service to use and two, which serverless service provider to use. Based on these, our codes might differ a lot, because we are kind of bound to use apis of email services or libraries of serverless providers.
Email sending service provider
There are several email sending service providers in the world, but my preference is MailGun, which has simple APIs which can be used to store and send emails. You can send up to 5,000 emails per month for free 👏. Alternatives are SendGrid, MailChimp etc.
For using MailGun, please follow these steps:
- you need to create an account, then verify your domain.
- Get the
API KEYfrom settings. - Then go to the mailing list page from Dashboard Left MenuBar > Sending > Mailing List, then click on the top right button saying
Create mailing list.
Serverless service provider
Again there are many serverless providers like AWS Lambda, CloudFlare Worker etc. But my preference is Netlify Functions because it provides a free plan with 100GB bandwidth and 300 minutes build time, which is sufficient for personal projects. FYI, you can use AWS Lambda or any other serverless provider, which should not cost you too much(maybe less than a dollar per month) 👊.
Implement Backend
Now, we are going to implement our backend using NodeJS and Express. Let’s create a empty directory and install the dependencies first:
mkdir newsletters && cd newsletters
npm install express mailgun-js netlify-lambda serverless-http --save
Pro Tip: These dependencies are specific to Netlify Functions. If you are using other serverless providers, please see their documentation. But you should be able to deploy this code in AWS Lambda.
Now there should be package.json file inside the folder, then add some scripts there:
{
    "scripts": {
        "prestart": "if [ ! -d node_modules ]; then npm install; fi",
        "postinstall": "netlify-lambda install",
        "build": "netlify-lambda build .",
        "serve": "netlify-lambda serve .",
        "start": "node server.js"
    },
    "dependencies": {
        "express": "^4.17.1",
        "mailgun-js": "^0.22.0",
        "netlify-lambda": "^2.0.3",
        "serverless-http": "^2.7.0"
    }
}
Pro Tip: Dependencies should be already there, add the scripts section only.
Now lets create a file named server.js inside the root directory.
const express = require('express')
const serverless = require('serverless-http')
const bodyParser = require('body-parser')
const app = express()
const router = express.Router();
const API_KEY = 'Your API Key'
const DOMAIN = 'Your Domain'
const MAILING_LIST = 'your_mailing_list'

const mailgun = require('mailgun-js')({ apiKey: API_KEY, domain: DOMAIN })


const list = mailgun.lists(`${MAILING_LIST}@${DOMAIN}`);

const template = {
  subscribed: true,
}

router.post('/', (req, res) => {
  let {name, address} = req.body
  let user = {
    subscribed: true,
    name: name,
    address: address
  }
  list.members().create(user, function (error, data) {
    res.json({
      "success": true
    })
  })
})

app.use(bodyParser.urlencoded({ extended: false }))
app.use(bodyParser.json())
app.use('/.netlify/functions/server', router)

module.exports = app
module.exports.handler = serverless(app)
A lot of codes here are specific to the Netlify Functions, but gist of the code is:
- Define
API_KEY,MAILING_LIST,DOMAINor collect from environment variables. - Create a
listinstance usingmailgun-jslibrary using above credentials. - If you make a POST request to express router
/,nameandaddressinformation will be collected from API and sent to mailgun instance.
Now we build the app and run it by:
npm run build
npm run serve
You should get an application running at:
http://localhost:9000/.netlify/functions/server
And you can make a post request to that server like this:
import requests  # need to install requests library: `pip install requests`

url = "http://localhost:9000/.netlify/functions/server"
data = {
    'address': 'youraddress@gmail.com',
    'name': 'Your Name'
}

response = requests.post(url, data)
print(response)
Then you should check the express application’s log and if there is no error then the email is added to the mailing list you have created in MailGun. Cool!!
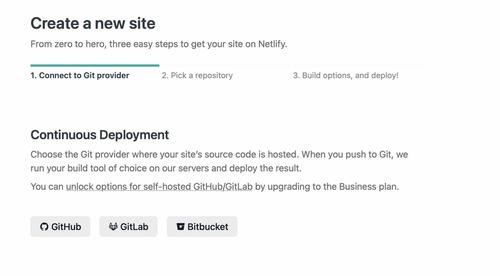
Deploy Backend
Now it is time to deploy the application. So you need to push this to your repository on GitHub. Then go to Netlify Dashboard and click into New site from Git. Then just point to the right repository and boom 💥, Netlify will build and deploy the server.
Your app should be available at:
https://<app-name>.netlify.app/.netlify/functions/server
Create MailGun Template
Now we have a backend which can collect name and email addresses by RESTful API. Now it is time to send emails. For that, you need to create an email template at MailGun. Create one from Dashboard Left MenuBar > Sending > Templates, then click on the top right button saying Create message template. You can use pre-designed templates when creating or you can create a custom one. For testing purposes, let’s create an empty template.
Write a email sending script using Python
Now we should have a template name from the previous step. Time for creating a new script which will be triggered by GitHub Actions based on cron job configuration.
import os
import json
import requests

TO_MAIL_LIST = os.environ.get('MAILING_LIST')
API_KEY = os.environ.get('API_KEY')
TEMPLATE_NAME = os.environ.get('TEMPLATE_NAME')


def send_email(title, data):
    x = {"from": "Newsletter",
         "to": TO_MAIL_LIST,
         "subject": title,
         "template": TEMPLATE_NAME,
         "h:X-Mailgun-Variables": json.dumps(data)}
    return requests.post(
        "https://api.mailgun.net/v3/mg.ruddra.com/messages",
        auth=("api", f"{API_KEY}"),
        data=x)


if __name__ == '__main__':
    data = {}  # variables used in template
    subject = "My subject for emails"
    send_email(subject, data)
This script should reside at the root of the Project. The gist of the code are:
- Collect
TO_MAIL_LIST,API_KEY,TEMPLATE_NAMEfrom environment variable. - Create
datadictionary based on variables used in MailGun Template. - Send emails using RESTful APIs of MailGun using template name and data.
Finally, add a dependency in the root of repository named requirements.txt:
requests==2.25.1
Write Github Actions workflow
FYI: Netlify Functions support cron job.
Now it is time to utilize the above code using GitHub Actions. First create a folder named .github in the root directory and then create a folder named workflows inside it. Now let’s add newsletters.yml file inside it:
Folder structure
Project
├── .github
│   └── workflows
│       └── newsletters.yml
├── server.js
├── package.json
├── requirements.txt
└── send_emails.py
YML file
name: Newsletter
on:
  schedule:
    - cron: "0 0 1 * *"
jobs:
  deploy:
    runs-on: ubuntu-18.04
    steps:
      - name: Git checkout
        uses: actions/checkout@v1

      - name: Setup python
        uses: actions/setup-python@v1
        with:
          python-version: "3.x"
          architecture: "x64"

      - name: Install dependencies
        run: pip install -r requirements.pip

      - name: Run scheduled task
        env:
          MG_MAILING_LIST: ${{ secrets.MAILING_LIST }}
          MG_API_KEY: ${{ secrets.API_KEY }}
          TEMPLATE_NAME: ${{ secrets.TEMPLATE_NAME }}
        run: python send_emails.py
Now let’s commit everything and push it to our repository.
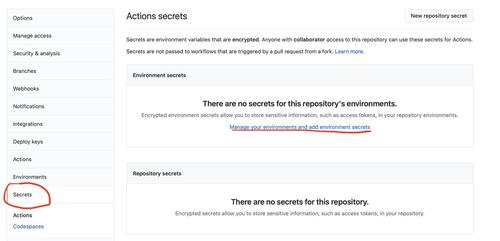
Configure GitHub Secrets
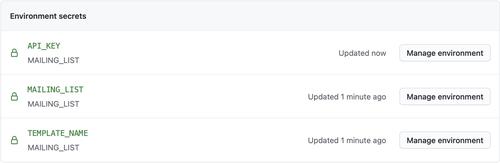
We have used environment variables to collect API_KEY, MAILING_LIST and TEMPLATE_NAME in the python script, so we need to define them in the Secrets section of the repository settings.
After adding the environment variables:
Now our workflow should be visible in the actions settings of the repository:

Our cron job is ready!! It should be triggered at 1st day of each month at 12:00 am(as defined in the workflow yml file).
Create a newsletter form
Now we have a backend which can store email addresses, and a cron job which will send emails. We can easily use the API in our static site either via form submission, or using JavaScript. 😄 Here is an example of HTML form:
<form action='http://localhost:9000/.netlify/functions/server' method=post>
    Name: <input type='text' name='name'>
    Email: <input type='email' name='address'>
    <button type="submit">Submit</button>
</form>
Example Code
The full implementation is available at this GitHub Repository which you can directly deploy to your Netlify account.
In conclusion
Thank you for reading. If you have any questions, please use the comment section below.
Last updated: Jul 03, 2026