Deploy A Python App to OpenShift: Planning and Preparations
Aug 11, 2018 · 6 Min Read · 3 Likes · 3 Comments
Deploying a Python application to OpenShift is fairly easy. Write a Dockerfile and run oc new-app /path/to/Dockerfile, that’s it!! But if you want implement a full fledged modern CI/CD using Jenkins and openshift, you need to do little more than that. So let’s dive into it.
We will explain about the whole process in three articles:
- Part One: We will explain the deployment structure and preparations.
- Part Two: We will write the Jenkins Pipeline.
- Part Three: Deploy using Jenkins Pipeline to OpenShift and Webhook implementation.
In this article, we will explain the deployment structure and required preparations for this deployment.
Deployment structure
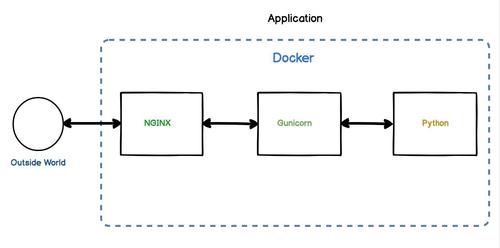
In this deployment, our python program will be running inside a container. That program will be served through a Gunicorn server. We will reverse proxy this server from NGINX, running in the same container. The following diagram shows our application structure:
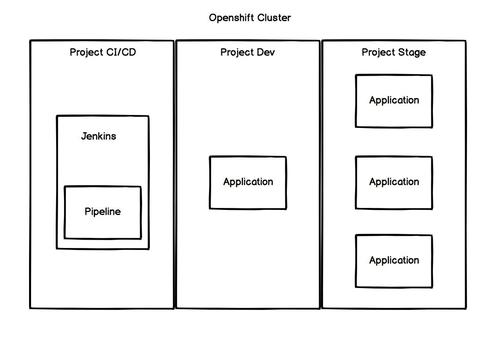
The OpenShift Cluster will have three project spaces, CI/CD, DEV and STAGE. CI/CD will contain the Jenkins file, running pipelines inside it. DEV and STAGE projects will have applications running inside them. Next diagram will show what we intend to do in this CI/CD project:
Preparations
For implementing this CI/CD project, we need to prepare few things beforehand. Let us go through them one by one.
A ‘Python’ application
NB: if you have a python application, which runs through gunicorn and has tests runable through nosetests(or any xml test result exporter) then please skip this section.
Writing a python application
For this demo purpose, we will use a small Flask application, which exposes a simple REST api. We will be using the code below:
from flask import Flask, jsonify

app = Flask(__name__)

tasks = [
    {
        'id': 1,
        'title': 'OpenShift Jenkins Pipeline Python/Nginx Implementation',
        'description': 'Find the implementation at https://github.com/ruddra/openshift-python-nginx'
    },
    {
        'id': 2,
        'title': 'OpenShift Jenkins Pipeline Django Implementation',
        'description': 'Find the implementation at https://github.com/ruddra/openshift-django'
    }
]

@app.route('/', methods=['GET'])
def get_tasks():
    return jsonify({'tasks': tasks})

if __name__ == '__main__':
    app.run(host='0.0.0.0')
First we should create a empty Project directory. Inside that, we will put another folder named app, which will contain the python application. Save the above flask application as flask_app.py. We need to install flask using pip install flask as well.
Adding gunicorn
We can run this application using python flask_app.py, but its not safe to use a development server in production. So we will use gunicorn to run our application. Let’s install that using pip install gunicorn, then write a wsgi.py inside the app directory.
from flask_app import app as application

if __name__ == "__main__":
    application.run()
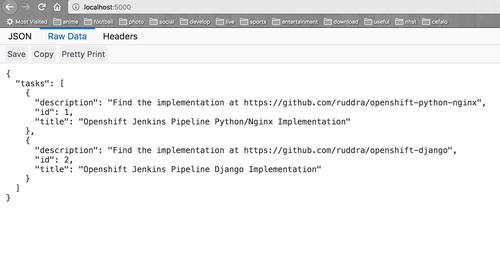
If we run gunicorn --bind 0.0.0.0:5000 wsgi, we should be able to see our project up and running in 0.0.0.0:5000. The output should look like this:
Writing tests
Writing tests are important, and we are going to store test results in Jenkins. For this purpose, let’s create some tests inside app directory.
import unittest

class MyTestClass(unittest.TestCase):
  @classmethod
  def setUpClass(cls):
      pass

  @classmethod
  def tearDownClass(cls):
      pass

  def setUp(self):
      pass

  def tearDown(self):
      pass

  def test_dummy_one(self):
      self.assertEqual(2, 2)

  def test_dummy_two(self):
      self.assertEqual(True, True)
For running the tests, we are going to use nosetests, so let’s install that using pip install nose. We can run tests using nosetests --with-xunit, it will generate a xml file which will contain the test results.
Our preparation is complete for the python application. Now let’s store our requirements using pip freeze > requirements.pip.
Preparing NGINX
In this step, we will write a NGINX configuration file which will proxy pass the gunicorn server.
upstream web {
  ip_hash;
  server 0.0.0.0:5000;
}

server {
    location / {
        proxy_set_header Host $host;
        proxy_set_header X-Real-IP $remote_addr;
        proxy_pass http://web/;
    }
    listen 8081;
    server_name _;
}
In here, the NGINX will listen to 8081 port. It will proxy pass gunicorn at location “/”. Let’s save the above code in default.conf file and store in config/nginx directory of the project.
Writing ‘Dockerfile’
This is the most important preparation step of our project. For this demo purpose, we will be using a alpine based nginx Dockerfile.
FROM nginx:mainline-alpine

# --- Python Installation ---
RUN apk add --no-cache python3 && \
    python3 -m ensurepip && \
    rm -r /usr/lib/python*/ensurepip && \
    pip3 install --upgrade pip setuptools && \
    if [ ! -e /usr/bin/pip ]; then ln -s pip3 /usr/bin/pip ; fi && \
    if [[ ! -e /usr/bin/python ]]; then ln -sf /usr/bin/python3 /usr/bin/python; fi && \
    rm -r /root/.cache

# --- Work Directory ---
WORKDIR /usr/src/app

# --- Python Setup ---
ADD . .
RUN pip install -r app/requirements.pip

# --- Nginx Setup ---
COPY config/nginx/default.conf /etc/nginx/conf.d/
RUN chmod g+rwx /var/cache/nginx /var/run /var/log/nginx
RUN chgrp -R root /var/cache/nginx
RUN sed -i.bak 's/^user/#user/' /etc/nginx/nginx.conf
RUN addgroup nginx root

# --- Expose and CMD ---
EXPOSE 8081
CMD gunicorn --bind 0.0.0.0:5000 wsgi --chdir /usr/src/app/app & nginx -g "daemon off;"
Let’s store this Dockerfile in root directory of Project. In Python Setup section, we are using a minimal python setup with pip enabled. For our demo purpose, this is just enough. If your project has more dependencies, then install them using apk add python3-dev ... etc. In NGINX Setup section, we have add the nginx default.conf file to /etc/nginx/conf.d/. In Expose and CMD section, we have exposed 8081 port and we will be running this command when the docker is running: gunicorn --bind 0.0.0.0:5000 wsgi --chdir /usr/src/app/app & nginx -g "daemon off;"
So far, the project directories should be looking like this:
| - Project
| -- app
| |-- flask_app.py
| |-- wsgi.py
| |-- requirements.pip
| -- config
| |-- nginx
| ||-- default.conf
| - Dockerfile
If you want to run this Dockerfile in project root directory, you can do this like:
docker build -t flask-nginx .
docker run -p 8081:8081 flask-nginx
You can access the application in browser through localhost:8081.
Preparing git repository
Let’s create a repository at your github/bitbucket account. Then push this code to that repository.
Preparing OpenShift/Minishift
I would recommend using minishif for this demo purpose. I am not sure if this app will run in free RedHat’s openshift cloud services. If you own a private OpenShift Server, that is fine too. For using minishift, please follow this okd guideline.
Preparing jenkins
Once your openshift/minishift is ready, let’s log into that system using:
oc login --server=server_name --username=your_username --password=your_password
Now, we need to create three project spaces, cicd, dev, stage for this demo purpose.
oc new-project dev   --display-name="Dev"
oc new-project stage --display-name="Stage"
oc new-project cicd --display-name="CI/CD"
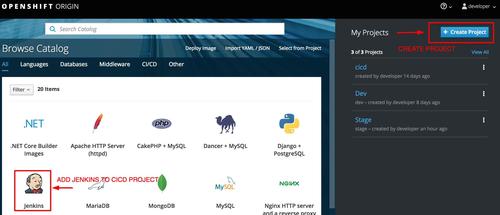
Very good. Now we are going to use project cicd and install Jenkins there:
oc project cicd
oc new-app jenkins-persistent
Let’s expose jenkin’s url using:
oc expose svc/jenkins-persistant
FYI: You can do this step using OpenShift UI as well.
Now, we need to give jenkins permission to make changes in dev and stage. Let’s do that using:
oc policy add-role-to-user edit system:serviceaccount:cicd:jenkins -n dev
oc policy add-role-to-user edit system:serviceaccount:cicd:jenkins -n stage
In conclusion
Our preparation is completed. Let’s continue with Jenkins pipeline in next article.
If you have any questions regarding this, feel free to comment. Thanks for reading.
Cheers!!
Last updated: Jul 03, 2026


as gunicorn will run in master worker setup, where have you defined the no. of workers ?
I usually put it with CMD. Like this:
as gunicorn will run in master worker setup, where have you defined the no. of workers ?