Progressive Web App in Hugo using GitHub Actions
Jun 20, 2020 · 4 Min Read · 10 Likes · 2 Comments
We all know or heard of Progressive Web Apps. I wanted to implement it because it enables web applications workable in offline, like a native app. Also it provides content faster by caching them.
With help of github actions and gulp, we can easily add it to a static site deployed in Github pages. In this article, we are going to see how to do that. We will be using Hugo as a static site generator, you can use any kind of static site generator like Gatsby, Next.JS etc.
If you do not have a Github Actions setup for your deployment, then please check this article to setup one.
Add manifest file
You need to create a manifest file inside static folder of hugo. It can look like this:
{
  "name": "My Website",
  "short_name": "MW",
  "icons": [
    {
      "src": "/favicon-16x16.png",
      "sizes": "16x16",
      "type": "image/png"
    },
    {
      "src": "/favicon-32x32.png",
      "sizes": "32x32",
      "type": "image/png"
    },
    {
      "src": "/img-192x192.png",
      "sizes": "192x192",
      "type": "image/png"
    },
    {
      "src": "/img-512x512.png",
      "sizes": "512x512",
      "type": "image/png"
    }
  ],
  "theme_color": "#000000",
  "background_color": "#ffffff",
  "display": "standalone",
  "start_url": "/",
  "scope": "/",
  "orientation": "portrait"
}
And add a link to it in your header section of html page:
<link rel="manifest" href="/manifest.json" />
Install dependencies
We are going to use gulp and workbox package for adding PWA. We can install them via NPM, like this:
npm init -y
npm install --save-dev gulp gulp-shell workbox-build
Create gulpfile.js
Now we are going to create the gulpfile.js. Then we are going to add the following lines:
const gulp = require("gulp");
const shell = require("gulp-shell");
const workbox = require("workbox-build");

gulp.task("hugo-build", shell.task(["hugo --minify"])); // this can change depending on which static generator you are using.

gulp.task("generate-service-worker", () => {
  return workbox.generateSW({
    cacheId: "yourCacheID",
    globDirectory: "./public", // the directory where static file is stored
    swDest: "./public/sw.js", // destination of sw.js file
    globPatterns: ["**/*.{js,css,html}"],
    navigateFallback: "/404.html", // fallback file
    globIgnores: ["**/index.xml", "**/index.json", "**/sitemap.xml"],
    runtimeCaching: [
      {
        urlPattern: /\.(?:png|jpg|jpeg|gif|bmp|webp|svg|ico)$/,
        handler: "CacheFirst",
      },
      {
        urlPattern: /\.(?:json|xml)$/,
        handler: "NetworkOnly",
      },
    ],
  });
});

gulp.task("build", gulp.series("hugo-build", "generate-service-worker"));
FYI, you need to configure globDirectory to the directory where static files are generated and swDest to the directory where service worker file will be stored. Also, we have defined hugo-build which will generate the files for static site. It may change depending on which framework you are using.
Then we will create a build task in package.json using:
    "scripts": {
        "build": "gulp build"
    },
Then we can run npm run build, and see that a sw.js file has been generated inside ./public/ directory.
Register service worker
Now we need to register the service worker in html at the bottom of the body tag:
<script>
  if ("serviceWorker" in navigator) {
    window.addEventListener("load", () => {
      navigator.serviceWorker
        .register("/sw.js")
        .then((swReg) => {})
        .catch((err) => {
          console.error("Service Worker Error", err);
        });
    });
  }
</script>
Define Github Actions
Now we are going to update our github action file(.github/workflows/main.yml) to add Node and build service work file.
name: CI
on: push
jobs:
  deploy:
    runs-on: ubuntu-18.04
    steps:
      - name: Git checkout
        uses: actions/checkout@v2

      - name: Setup hugo
        uses: peaceiris/actions-hugo@v2
        with:
          hugo-version: "0.64.0"

      - name: Install Node
        uses: actions/setup-node@v1
        with:
          node-version: "12"

      - name: Build
        run: |
          npm install
          npm run build

      - name: Deploy
        uses: peaceiris/actions-gh-pages@v3
        with:
          personal_token: ${{ secrets.TOKEN }}
          external_repository: <username>/<username>.github.io
          publish_dir: ./public
          user_name: <username>
          user_email: <username@email.com>
          publish_branch: master
Cool! We are almost ready.
Deploy and test
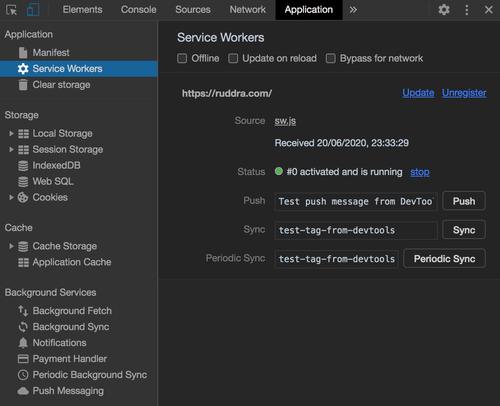
Now we are going to push our changes to Github and then see if the changes are there in your website after successful deployment. If you have chrome, then go to your website and open Inspect Element and then click on Applications tab. Then you should see something like this if you click on Service Worker:
If you want to test in your local machine, then install a http server using npm install -g http-server, and run it using http-server, like this:
>> http-server
Starting up http-server, serving ./public
Available on:
  http://127.0.0.1:8080
  http://192.168.68.107:8080
Hit CTRL-C to stop the server
Then check for service worker same as above(from Inspect Element > Applications).
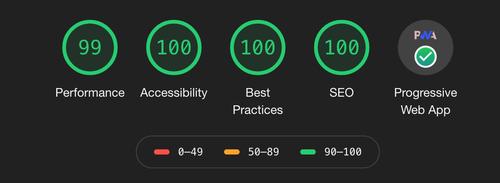
You can test with lighthouse as well, and it should look like this 😉
In conclusion
PWA is a BIG thing now, giving your website more robust experience and awesome features like offline browsing. With Github actions, you can easily integrate it with your website.
If you have any questions or a better solution, let us talk in the comment section below.
Acknowledgment
Last updated: Jul 03, 2026


Hey, I’ve been implementing your tutorial but I got an error, it didn’t recognize the sw.js file. In public directory I’m sure that file is there.
Hi lymau, it won’t work if you try to run the server using
hugo servercommand. You need to use: