Hugo: Deploy Static Site using GitHub Actions
Mar 06, 2020 · 6 Min Read · 40 Likes · 22 Comments
If you are using Hugo to generate static pages, you are familiar with CLI commands which are to build the static pages in your local machine and make push to your <username>.github.io repository. When it comes to using Hugo for blogging, compared to platforms like Medium or WordPress, it is very painful because you do not have any web interface to make changes whenever you want or wherever you want.
But thanks to GitHub Actions, you can almost overcome this problem, just you won’t have an admin panel like other platforms, but use GitHub’s UI to make changes. In this article, we will see how you can do that and without using any CLI, deploy your static pages!!
What is GitHub Actions
GitHub Actions is a CI/CD tool to automate test, build and deployment process in GitHub. It is kind of equivalent to GitLab CI/CD or BitBucket Pipelines. GitHub actions will make it easy to automate all your software workflows.
Steps to deploy Hugo with GitHub actions
We are going to deploy our site in GitHub Static Pages for this article. Let us go step by step from setting up Hugo to create actions for deployment. Also, in the first few steps you need to use CLI from your local machine, but just bear with me and you will be rewarded handsomely at the end 😄.
FYI: If you already have a Hugo based setup in GitHub, you can skip the first three steps.
Step 1: Setting up repo named <username>.github.io in GitHub
You need to create a repository named <your GitHub username>.github.io. Contents on that page will be accessible via url same name as the repo.
Step 2: Install and create a Hugo project
You need to install Hugo in your local machine and use that to create a site. Please take a look at the official documentation on how to do that.
Step 3: Push Hugo site code in GitHub
Now create a new GitHub repo for that Hugo site, and push to master branch. Just follow this steps:
git init
git remote add origin git@github.com:<username>/<repo-name>
git add --all
git commit -m "Commit MSG"
git push origin master
If you have added a theme, then consider adding it as submodule(also stated in the hugo documentation):
git submodule add https://github.com/budparr/gohugo-theme-ananke.git themes/ananke
Better if you update the submodule to get latest theme changes before pushing the code:
git submodule update --init --recursive
git push origin master
Or you can always update the latest theme in the actions. Example has been shared in create github action section.
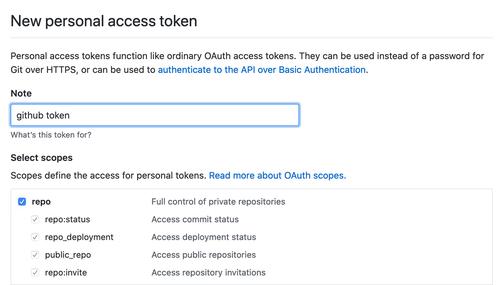
Step 4: Create GitHub token
Now you need to generate a token with repo access from the GitHub’s tokens page. You will get a 40 character long token by generating the token. Store it somewhere securely.
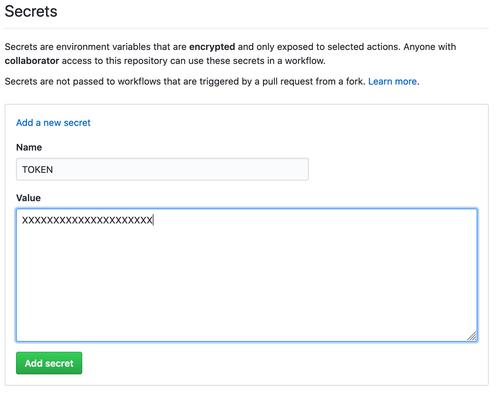
Step 5: Add token as secret in GitHub
The token last step, you can store it in the Secrets setting of the repo. It can be accessible from https://github.com/<username>/<repo-name>/settings/secrets. Store it like this:
Step 6: Create A GitHub Action
Now it is time to do the fun stuff. Let us create an action in .github/workflows/ folder inside the repo(hugo site repo) and name it main.yml.
name: CI
on: push
jobs:
  deploy:
    runs-on: ubuntu-18.04
    steps:
      - name: Git checkout
        uses: actions/checkout@v2

      - name: Update theme
        # (Optional)If you have the theme added as submodule, you can pull it and use the most updated version
        run: git submodule update --init --recursive

      - name: Setup hugo
        uses: peaceiris/actions-hugo@v2
        with:
          hugo-version: "0.64.0"

      - name: Build
        # remove --minify tag if you do not need it
        # docs: https://gohugo.io/hugo-pipes/minification/
        run: hugo --minify

      - name: Deploy
        uses: peaceiris/actions-gh-pages@v3
        with:
          personal_token: ${{ secrets.TOKEN }}
          external_repository: <username>/<username>.github.io
          publish_dir: ./public
          #   keep_files: true
          user_name: <username>
          user_email: <username@email.com>
          publish_branch: master
        #   cname: example.com
As mentioned from main.yml file, it is named CI and this is going to be triggered when something is pushed to the repo. It will be using an ubuntu-18.04 based VPS to run the pipeline. Now let us go through steps to understand how it works:
In the
Git checkoutstep, we are going to fetch the latest code of our repository which contains Hugo site.In the
Setup hugostep, we are going to use peaceiris/actions-hugo to install Hugo. You need to specify which hugo version you want to use. I would recommend using hugo version of your local machine(command:hugo version).In the
Buildstep, we are going to build the static contents usinghugo --minifycommand. By using--minify, we are going to minify the assets in the site. For more information, checkout the hugo documentation.Finally, the
Deploystep. Now we are going to deploy the static contents from the last step. And we are going to use peaceiris/actions-gh-pages actions to run the deployment. Here, we usedexternal_repository: <username>/<username>.github.iobecause otherwise the static contents would be pushed in the same repo(in a different branch). As we specified the external repository, the static contents will be pushed to<username>.github.io. For this step, we will use the personal token which we specified in Step 5. If you uncommentkeep_files: true, then the deployment will keep old files from<username>.github.io, otherwise it will replace everything. Finally, if you have a custom domain, then configuringcnameis necessary. For more information, please check documentation in GitHub marketplace.
Step 7: Push to GitHub
Now push to your Hugo site repository and voila, your action will start automatically. You can check its progress in the actions tab.

After each successful run, it will push the static contents to your static page repository.
Step 8: Never use CLI again
Now you have everything in GitHub, so you do not need to come back to your local machine and use CLI to push changes. Use the web interface, and GitHub actions will take care of the rest.
In conclusion
Although you need to create a Hugo site in your local machine and push it manually to GitHub at least for the first time and consequent changes can be done from the web(but you can do that from your local machine as well). Just create a markdown file in repo and boom! It is on the internet.
Thank you for reading. If you have any questions or a better solution, let us talk in the comment section below. Cheers!!
Last updated: Jul 03, 2026


I am using Hugo Version
0.56.3. The action failed to deploy the hugo site with this error:Then I changed the
deploypart as following:Now the action runs fine and my hugo site is being deployed successfully.
Yay! I do not need to run any more shell script to deploy the public directory content to username.github.io repository!!
Thank you for this great tutorial.
I am glad that, this post helped you with automating your deployment 😄
Very helpful, thank you very much.
Also, if you have theme, don’t forget to add somewhere:
Yep, you are right. I will update the post. Thanks :)
Here is the action script that updates submodule:
Okay, I will update the script with this. Thanks
Thanks a lot, this is very useful, works as described even with Hugo 0.70+ and saves so much time and even money for not having to use external providers for hosting, etc.
You’re welcome. 😄
Thanks for the write up!
I like the automation, but still need the local quick preview. So I keep my local hugo. It is started once via a powershell script, polls the local git repo clone, and publishes to a tmp file outside the git scope, so I won’t get any changes into the web site repo from the local tests. In the browser I create a preview bookmark that points to localhost:1313. With the automated refresh feature from hugo, I get a near-life update of the web page. When I am satisfied with the work, I commit with github Desktop. Mark Text as IDE, ready to go even for non.techies ;)
I would say this is just tip of the iceberg. You can so much more than just automation. I build my search indexes for lunr search, send newsletters, compress images, build service worker for progressive web app in the GitHub actions. 😄
Super, this helped a lot!
Thanks, this helped a lot!
In My Opinion this tutorial is TOTALLY Dangerous, because you are giving an external party (peaceiris/actions-gh-pages@v3) complete admistrative and write access to ALL your Repositories on github, because you are defining a single Token for ALL Repos.
Any malfunction or hostile action or bug in peaceiris/actions-gh-pages@v3 will be allowed to do anything to your repositories and have even access to your private repositories.
I, for one, will not allow any external service a complete access to all repositories.
You can authorize deploy keys on a repo basis, which then can be allowed to push into exactly the repo they need to. This can be used by external services/gh-actions to rollout/deploy.
I completely agree with you, on the other hand it is the same pitfall for all other opensource solutions. It can be a source of vulnerability or be the vulnerability itself. IMO, the remedy is not to stop using the solution, rather look into the package itself (as it is opensource) and find if there is any potential problems.
found fabform.io easy to add hugo forms
You have to change the
baseURLinconfig.tomlright?No, you don’t need to. It should remain as it is.
Hi thanks for the good post. I might be bit too dull, as I don’t get it, should it be one and same repository for github.action or separate repository?
I am just getting page not found. https://github.com/thepenguinthatwants/thepenguinthatwants.github.io/tree/main
It also created gh-pages branch. Which doesn’t seem to have public folder.
Ah I figured it out, or well did it probably wrong way. So I changed it to Branch gh-pages and root.
It works, but probably not the main idea with this. Wondering why I couldn’t make it read from main repository and publish using main branch.
The contents from public folder of your Hugo repository should be pushed to your .github.io repository (in the root). See my github page repository here as an example: https://github.com/ruddra/ruddra.github.io