Create a Web App with JWT Authentication using Django
Apr 22, 2020 · 5 Min Read · 21 Likes · 0 Comment
Let us say, you need an authentication service in a rush, which needs to be cutting edge and uses JWT based authentication. Or you need a stand alone authentication service to be plugged in with other microservices. Do not worry, you can create one in 10 minutes. All you need to have is Python and Docker installed in your machine. In this article, I am going to share how you can do this in a few simple steps.
FYI, for this project you do not need prior django knowledge. Just having a coding background should be good enough or some Python syntax knowledge would be nice. Without further ado, let us start our stopwatch and begin:
Install CookieCutter
First, we need to install the cookiecutter. It allows us to create projects from templates. To install it, we need to run:
python3 -m pip install cookiecutter --user
Create Django project
Now we are going to create the django project using cookiecutter. We are going to use cookiecutter-django as template project:
cookiecutter https://github.com/pydanny/cookiecutter-django
It will prompt for many options. Here is my setup:
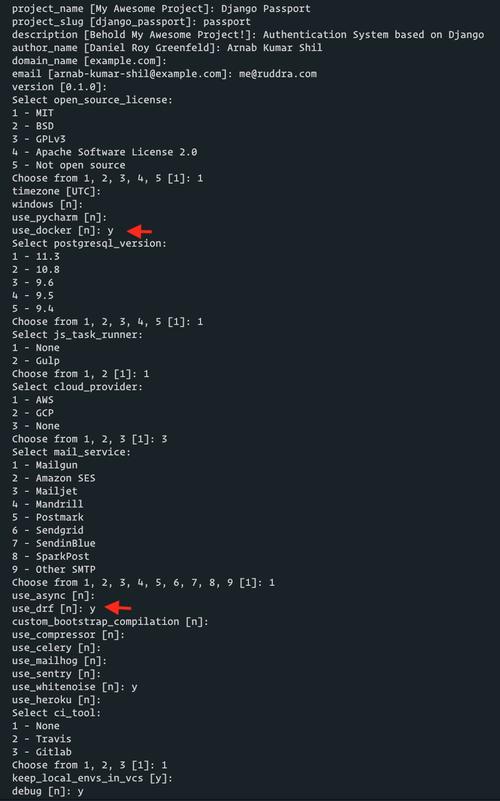
We have prompted yes for Django Rest Framework and Docker. Rest of the setup can be based on your preference. Cool, now we have our boilerplate project.
Setup RESTful API
Now we have our django application, let us integrate API. We already have Django Rest Framework pre-installed with cookiecutter, so we are going to use a library which utilizes that and provide authentication. My preference is .
According to djoser’s documentation, let us add the app in config/settings/base.py, like this:
THIRD_PARTY_APPS = [
    "crispy_forms",
    "allauth",
    "allauth.account",
    "allauth.socialaccount",
    "rest_framework",
    "djoser"
    # "rest_framework.authtoken", #<---
]
We are commenting out rest_framework.authtoken(marked with #<---) from THIRD_PARTY_APPS, as we plan to use JWT based authentication.
Let us change in config/urls.py as well:
urlpatterns += [
    path("api/", include("config.api_router")),
    path("auth/", include('djoser.urls')),
]
Keep in mind that cookiecutter-django provides a token based authentication. As our plan is to use JWT based authentication, so we will be removing token based authentication related codes from the project.
Setup JWT authentication
Our project is ready for integration with JWT based authentication. For that, we are going to use django-rest-framework-jwt:
Let us add JWTAuthentication authentication class to the DEFAULT_AUTHENTICATION_CLASSES in config/settings/base.py:
REST_FRAMEWORK = {
    "DEFAULT_AUTHENTICATION_CLASSES": (
        "rest_framework_simplejwt.authentication.JWTAuthentication",
    ),
    "DEFAULT_PERMISSION_CLASSES": ("rest_framework.permissions.IsAuthenticated",),
}
We need to add token generation url paths to config/urls.py:
urlpatterns += [
    path('auth/', include('djoser.urls')),
    path('auth/', include('djoser.urls.jwt')),
]
Now, let us add the new dependencies in requirements/base.txt file:
djangorestframework-simplejwt==4.4.0
djoser==2.0.3
Please check the djoser documentation regarding jwt API endpoints.
Spin up the docker
Let us start our docker containers using docker-compose. If you don’t have it, then install it from docker-compose installation guide. My suggestion is to use pip:
python -m pip install docker-compose --user
Now, let us start the development server by(from root of the project):
docker-compose -f local.yml up
Awesome, we have our project running. For production server use:
docker-compose -f production.yml up
But, you need to keep in mind, if you want mail sending functionality, make sure to add them either in .envs/.product/.django file or set as an environment variable in *.yml file.
Miscellaneous
Okay, now our project is running. So let us clean it up a little. Also, some of the setup might be a bit complex and may require some django knowledge.
Remove unnecessary dependencies
This step is useful if you want to make this application only as a REST API based backend.
We are going to clean up codes regarding django allauth and crispy form. Just remove them from THIRD_PARTY_APPS inside config/settings/base.py .
THIRD_PARTY_APPS = [
    "rest_framework",
    "rest_framework.authtoken",
]
Also, we need to remove some unnecessary codes from template passport/templates/base.html. Otherwise it will cause errors because of missing libraries. Let us replace it with something simple:
<html>
  <body>
    <h1>Hello from base</h1>
  </body>
</html>
We also need to clean up allauth related codes from config/urls.py. Here is a cleaned up version:
from django.conf import settings
from django.conf.urls.static import static
from django.contrib import admin
from django.urls import include, path
from django.views import defaults as default_views
from django.views.generic import TemplateView

urlpatterns = [
    path("", TemplateView.as_view(template_name="pages/home.html"), name="home"),
    path(settings.ADMIN_URL, admin.site.urls),
] + static(settings.MEDIA_URL, document_root=settings.MEDIA_ROOT)
urlpatterns += [
    path("auth-token/", obtain_auth_token),
]
Change header
By default, HEADER will look be like this JWT <XXXXXXXX>, which is not Bearer schema. You can change it to Bearer <XXXXXXX> by adding the following lines in config/settings/base.py:
SIMPLE_JWT = {
    'AUTH_HEADER_TYPES': ('Bearer',),
}
And more
- Add social authentication using djoser’s documentation.
- Add API documentation using DRF documentation.
Why wait 10 minutes when you can clone it
Assuming you do not want to take the trouble of creating the project from scratch, then simply clone my project from github and spin up the docker.
In conclusion
Steps till miscellaneous section took me around 5-10 minutes. But it may take longer depending on various conditions like on internet speed, machine configuration and prior python/django knowledge. But, this solution is top notch and you can easily deploy it with docker anywhere. You can also plug it in as a microservice and handle authentication smoothly.
Thank you for reading. Let me find your experience in the comment section below.
Last updated: Jul 03, 2026