Deploy Django to OpenShift 3 Powered by MySQL and Gunicorn
Feb 24, 2018 · 6 Min Read · 1 Like · 0 Comment
If you want to use OpenShift for deploying Django, you can follow this post and simply do that. You don’t need to learn Kubernetes. We will use docker file only. No other fancy stuff.
Also, before starting, I am also hoping you are little bit familiar with OpenShift 3 and oc tools. You can download the oc client as well.
So let’s get started.
Contents of this post
In the blog, we are going to discuss about how we can deploy production grade django server, using mysql as Database. We are also going to use Gunicorn to deploy Django. We will be using Whitenoise to serve static files. We will use Persistent Volume provided by OpenShift to store media contents. A working example for deploying can be found here: Deploying Django in OpenShift Github Repo
Now let’s discuss part by part about the deployment.
Deploying database
First we need to deploy our mysql server to OpenShift. We are going to do that using this command:
oc new-app openshift/mysql-55-centos7
It will start building the deployment for mysql. But it will throw error as there is no MYSQL_USER, MYSQL_PASSWORD, MYSQL_DATABASE defined in environment variable. So we can update the deployment by this commands:
> oc env dc/mysql-55-centos7 MYSQL_USER=myroot

> oc env dc/mysql-55-centos7 MYSQL_PASSWORD=myroot123

> oc env dc/mysql-55-centos7 MYSQL_DATABASE=mydjango
You can check the deployment name using the command oc status.
Now our MySQL server is ready inside OpenShift and it should look like this:
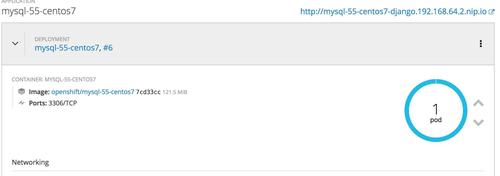
In our django application, we can use internal service name(FYI:It did not work for my local machine) mysql-55-centos7 in DATABASE_SETTINGS or we can use internal IP which we can find in application>pods. Checkout the list of pods:
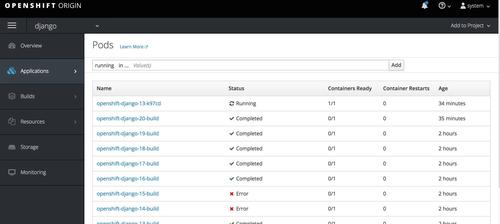
Find out the running Pod of Mysql and when you click on the name, you will go the details page. There you can find the IP like given image given below:
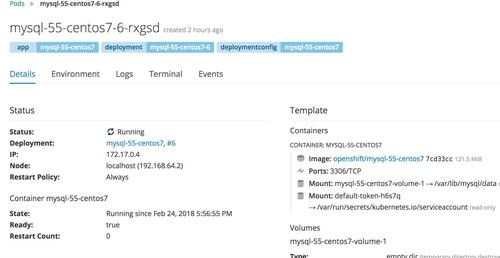
You can update the settings of the Django application like this:
DATABASES = {
    'default': {
        'ENGINE': 'django.db.backends.mysql',
        'NAME': 'mydjango',
        'USER': 'rootadmin',
        'PASSWORD': 'rootadmin123',
        'HOST': '172.17.0.4',  # The IP we get from Pods
        'PORT': '3306',
    }
}
That’s it, our mysql configuration is done.
Making django project
We need a django application for this deployment right!! So let’s create one or if you have one, you can use it(lets hope its not too much complicated). If you have one, then please skip to next section.
django-admin.py startproject django-openshift
Now inside the project, lets create an app:
django-admin.py startapp pictures
and add this app to django project:
#inside django settings(django-openshift/django-openshift/settings.py)

INSTALLED_APPS += [
    'pictures'
]
Lets update the models.py of pictures:
from django.db import models


class Pictures(models.Model):
    image = models.ImageField()
and update the admin.py
from django.contrib import admin
from .models import Picture

admin.site.register(Picture)
and add a requirements.pip file in the root directory with the given entries:
django>=2.0
mysqlclient==1.3.12
pillow==5.0.0
gunicorn==19.7.1
whitenoise==3.3.1
We have created a really simple django application where we can upload photos.
Creating ‘Dockerfile’ for django
Now lets create the Dockerfile for django:
FROM python:3.6
ENV PYTHONUNBUFFERED 1

RUN mkdir /src
WORKDIR /src
ADD . /src

RUN pip install -r requirements.pip

RUN ./manage.py migrate
RUN ./manage.py collectstatic --no-input

CMD gunicorn openshift_django.wsgi -b 0.0.0.0:3013

EXPOSE 3013
In this dockerfile, we are going to do the following stuffs:
We will be using
python:3.6official image.We are going to install dependencies from requirements.pip.
We are going to run database migrations.
We are going to put gunicorn command which will make the application running in CMD.
We are going to expose 3013 port.
We are going to expose 3013 because it’s one of the default port for openshift, we can also use 8080 as well.
Serving static and media contents
For serving static files, we are going to use whitenoise. Its pretty simple, please go their documentation and check how they configure it in Django.
For Media content, we are using django’s own media serving mechanism. You can update the urls.py like this:
from django.conf.urls import url, re_path
from django.views.static import serve
from django.conf import settings

urlpatterns += [
    re_path(r'^media/(?P<path>.*)$', serve, {
            'document_root': settings.MEDIA_ROOT,
            }),
]
So media will be served from url path /media/*
Now we need to configure media settings in settings.py.
MEDIA_ROOT = '/data/' # Why data? explained in below
MEDIA_URL='/media/'
So, it will store media contents in /data directory whenever its uploaded through django.
Deploying django to OpenShift
There are many ways to deploy to openshift. You can check the documentation of deployment for more details. But I can share my ways.
Lets say, you have your application in git. So you can deploy it using
oc new-app /path/to/src
Then it will push the git configurations to openshift. Then openshift will pull code from git, build the image and start deploying it.
Or you can use
oc new-build /path/to/src
It will push binary to openshift, and openshift will build image from that and start deployment.
If you want to rebuild the app, you can use
oc start-build ./path/to/src
It will start new build.
Now, if you want to see status of your deployment from console, you can use oc status command. If you want to expose your app(it will create url and you can access it through that url), then use this command:
oc expose svc/<your-service-name>
Allowed hosts in django
Once deployed, if you try to access the application, you might face errors. And one of the most common error is related ALLOWED_HOSTS. There is several ways to avoid this, like you can put
ALLOWED_HOSTS=['*']
It will allow all hosts. Or
ALLOWED_HOSTS=[
os.environ.get('OPENSHIFT_DNS', '*')
]
And you can configure the deployment by adding environment variable like this:
oc env svc/<your-service> OPENSHIFT_DNS='YOUR OPENSHIFT DNS'
Uploading images in persistent volume
When you try to upload images, You will face permission errors from Django. To avoid that, you can attach storage(Persistent Volume) to your deployment. To do that, create a storage from console like this given image:
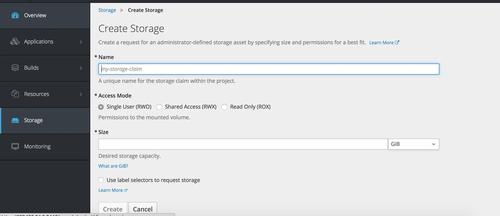
Put any name you want, access mode can RWO, size 1 GB or anything you wish.
After creating the storage, go to deployment configuration:
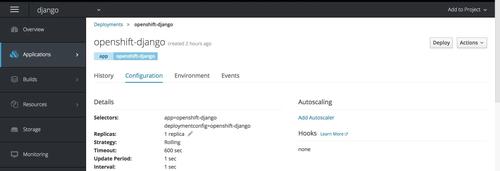
/data like image below: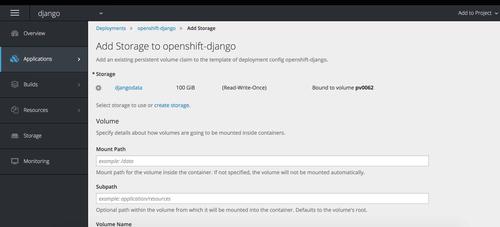
That’s about it, you should be able to access your application in exposed url.
For more advanced stuff, please checkout OpenShift’s Blog about how they deploy Django.
Thanks for reading. Cheers!!
Last updated: Jul 03, 2026

![[Travel] Journey to the Land of Thunder Dragon](/content/images/2018/04/road_trip_2-1_hufbbc7d256ff4aabd4402be3990a39eab_343724_350x0_resize_q75_lanczos.jpg)