Add Search Functionality in Hugo
Jan 29, 2022 · 4 Min Read · 60 Likes · 8 Comments
Adding search functionality make your website more accessible and usable to the stakeholders. In this article, I am going to share on how you can add this in a static site generated by hugo.
Expose JSON output
In the first step, we need to expose the json output for the files. For that, we need to change in config.yaml:
outputs:
  home:
    - HTML
    - RSS
    - JSON # add this change
Same configuration for config.toml:
[outputs]
    home = [ "HTML", "JSON", "RSS"]
Then create a file named index.json at the root of your project and add the following code:
{
    "items" : [
    {{ range $.Site.RegularPages -}}
    {

        "url" : "{{ .Permalink }}",
        "title" : "{{ .Title }}",
        "content": {{ .Content | plainify | jsonify }},

    {{ end -}}
    ]
}
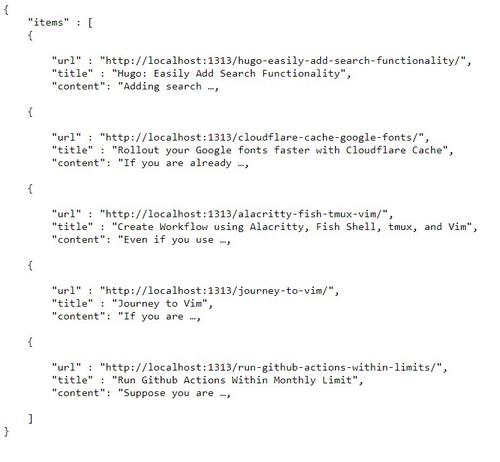
Then if you run the server, you should be able to access localhost:1313/index.json file and it should return a json file containing the url, title, and contents of your posts. It should look something like this:
Create layout
The next step is to add a page where we will be showing the search content. For that we need to make two changes.
- Create a
content/searchfolder and add a_index.mdfile incontent/searchfolder. - Go to the
layoutsfolder and createlayouts/section/search.htmlfile.
Folder structure should look like this:
Project
├── contents
├── content
│   └── search
│       └── _index.md
├── layouts
│   ├── partials
│   └── section
│       └── search.html
├── static
├── themes
├── index.json
└── config.toml
Build the search page
Now let us build the search page. For that we can use the same layout structure as your theme’s any single.htmlfile at the layouts/_default folder. For example, if you use Anake theme, you can use it’s single.html file as template for rendering the page. Here is an example:
{{ define "main" }} {{end}}
Apart from that, update the _index.md file mentioned above with the following code:
+++
title = "Search"
description = "This is the search page for this website."
date ="2022-01-28T00:00:00+00:00"
+++
Now we can go to localhost:1313/search page, where we should be able to see a blank page.
Add lunr.js file
Now, you need to add the lunr.js file to your project. Add it by using:
<body>
  ...
  <script src="https://cdnjs.cloudflare.com/ajax/libs/lunr.js/2.0.2/lunr.js"></script>
</body>
Add search functionality
Add HTML
Now our structure has been placed. We can build the search functionality on top of it. First we need to add an input field to enter the search query. Let us do that in search.html file:
{{ define "main" }}
<div class="container">
  <section class="post">
    <h1 class="post-title">Search:</h1>
    <input
      type="text"
      id="search-input"
      placeholder=""
      oninput="showSearchResults()"
    />
    <br />
    <ul id="list"></ul>
    <!-- this list is for rendering the results -->
  </section>
</div>
{{end}}
Add JavaScript
In the code, you can see that we wrote oninput="showSearchResults(), which means on each input, the showSearchResults() function will be executed. Let’s write that function in a separate javascript file, for example like in static/js/search.js:
var searchElem = document.getElementById("search-input");
var posts;
function loadSearch() {
  // call the index.json file from server by http get request
  var xhr = new XMLHttpRequest();
  xhr.onreadystatechange = function () {
    if (xhr.readyState === 4) {
      if (xhr.status === 200) {
        var data = JSON.parse(xhr.responseText);
        if (data) {
          posts = data.items; // load json data
        }
      } else {
        console.log(xhr.responseText);
      }
    }
  };
  xhr.open("GET", "../index.json");
  xhr.send();
}
loadSearch(); // call loadsearch to load the json file
function showSearchResults() {
  var query = searchElem.value || ""; // get the value from input
  var searchString = query.replace(/[^\w\s]/gi, ""); // clear white spaces
  var target = document.getElementById("list"); // target the ul list to render the results
  var postsByTitle = posts.reduce((acc, curr) => {
    // map lunr search index to your articles
    acc[curr.title] = curr;
    return acc;
  }, {});
  // build lunr index file
  var index = lunr(function () {
    this.ref("title");
    this.field("content");
    posts.forEach(function (doc) {
      this.add(doc);
    }, this);
  });
  // search in lunr index
  if (searchString && searchString != "") {
    var matches = index.search(searchString);
    var matchPosts = [];
    matches.forEach((m) => {
      matchPosts.push(postsByTitle[m.ref]);
    });
    if (matchPosts.length > 0) {
      // match found with input text and lunr index
      target.innerHTML = matchPosts
        .map(function (p) {
          if (p != undefined) {
            return `<li>
                        ${p.date} -
                        <a href="${p.url}"> ${p.title}</a>
                        </li>`;
          }
        })
        .join("");
    } else {
      // if no results found, then render a general message
      target.innerHTML = `<br><h2 style="text-align:center">No search results found</h2>`;
    }
  } else {
    target.innerHTML = "";
  }
}
Now let us add this into the html of hugo (in footer file preferably):
<script src="/js/search.js"></script>
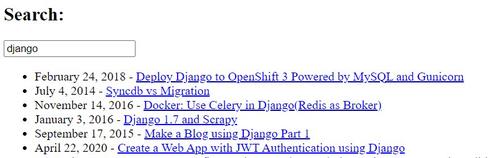
Cool, now our search functionality should be working and the output should look like this localhost:1313/search/ uri.
In conclusion
With help of Lunr and Hugo’s own functionality, we have added search functionality in the static site. Hope you like it and if you have any comments, please share below.
Last updated: Jul 03, 2026


var query = searchElem.value || ‘’; // get the value from input
It shows error on this line
What error do you get, please?
I found this helpful to add a hugo contact form to your static website
how to add a hugo contact form
your config.toml changes perplex me right out of the gate. you use “:” instead of “=” and even changing this my code editor doesn’t recognize the syntax
your config.toml changes perplex me right out of the gate. first, you use “:” instead of “=” and even upon changing this, my code editor doesn’t understand the syntax
You are right. It should be yaml. For toml, the configuration should be:
Thank you for notifying.
json lint did not pass on supplied file, used a quick modification count method to create proper json. diff -du index.tmp.json index.json — index.tmp.json 2024-08-07 04:39:30.307461137 +0000 +++ index.json 2024-08-06 20:02:06.742308071 +0000 @@ -1,13 +1,21 @@ { “items” : [
- “url” : “{{ .Permalink }}”, “title” : “{{ .Title }}”,
+} +
Thank you for looking into it. I will update the content accordingly!